In doing some updates on MommaMuse, I realized I didn’t have a dedicated post for my Rosemary Mint Soap recipe. It is included on my Crock Pot Soap Making Tutorial, but it’s such a good soap, it deserves a post all to its self… Instead of just sharing the recipe, I ended up with a Tutorial on how to make cold process soap.
Gather your ingredients and additives:
Rosemary Mint Handmade Soap
4 pounds
– 38 ounces olive oil (59.38%)
– 14.4 ounces palm kernel oil (22.5%)
– 11.6 ounces palm oil (18.13%)
– 8.7 ounces sodium hydroxide (5% discount)
– 17.5 ounces distilled water
– 3 ounces rosemary mint blend essential oils
– 2 teabags of Organic Peppermint tea
This soap makes a 4 pound batch. That may be a bit large, or too small, for your needs, so the percentage is included to help you downsize (or up-size, as the case may be).
If you follow the link for the Crock Pot Soap tutorial, you’ll find step-by-step instructions, including pictures, on how to make it with your crock pot. One thing I really like about the crock pot is that it produces a sort of translucent soap.. it’s a very lovely soap. But, you may prefer the cold process of soap making.
This process may be used for any soap recipe. Read through the directions before starting, to familiarize yourself with the process.
1. Measure your solid oils and melt them over low heat.

2. a. While your oils are melting over low heat, measure you liquid (in this recipe, distilled water) in a dedicated lye mixture container – this is something you will not use for anything but your lye mixture.
2. b. Measure you lye, and add your lye TO your water. note: Always add the lye TO the water to avoid sudden splash-up. This will heat up pretty hot.. so set it aside to cool.. or you could put it outside (if it’s cool/cold) or in the fridge (Be sure you container is labeled clearly so no one uses it, and be careful in moving it around so as not to spill it).. so, your lye mixture is mixed and cooling.
2. c. You could use extra tea bags to make a tea with the distilled water. Steep the teabags, as you would when making tea. Allow the tea to cool. Make sure you use more water than is called for for the recipe, so when the wet tea bags are removed, you’ve got enough water left to make the lye mixture. Cool, or chill, measure and then follow steps above for the lye mixture.
3. Measure out your extra ingredients. Set aside.
– In one bowl measure your fragrance or essential oils.
– In another bowl, open the tea bags, so the teas are loose.

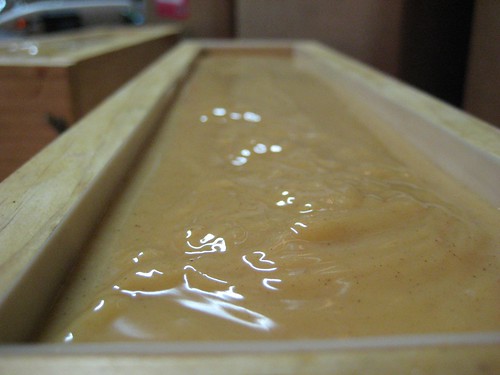
4. Make sure your soap mold is clean, lined and ready to use. My first soap mold was an old cigar box. I then made myself a flat, square wooden mold. I lined each of these with freezer paper, or wax paper. Once I started making soaps for sale, my husband made me wooden molds that produced nice soap logs. One short end was able to screw on and off, for easy log-removal. I used high temperature quilting mylar (found in the quilt section of your local fabric shop – make sure to get high temperature), cut to fit all four sides and the bottom.

5. Once your solid oils are melted, add your olive oil. This will help bring down the temperature of you melted oils. You want your melted oils to be close to room temperature when you add your lye mixture. I found room temperature (or the slightly cooler) was best when combining your lye mixture to your oils.
When the temps are warmer it seems to speed up ‘trace’ (when the mixtures thickens), causing the combined lye mixture and oils to thicken up faster. This could be a problem if you are adding colorants, or other additives, when you need a few extra minutes to get things mixed well.
6. Add your lye mixture to the oils, and with your handy-dandy stick blender and begin mixing and blending. Mix and blend, mix and blend.

7. When you see a light trace.. this will be like a “trail” that is left when you move the stick blender through the soap mix. It will take a few seconds to melt away on its own.

Trace has been reached.. now it’s time to add your fragrance or essential oils and your loose tea. Blend it in well and get ready to pour it into the prepared mold.
8. Pour gently, so as not to splash up, the soap into the mold.
9. Set aside to finish the saponification (this is what the chemical process of the lye mixture and the oils go through in order to “change” and make soap) process. Some people like to “insulate” their soap while it goes through this process. To do this, you can wrap it in a towel or blanket. I would put a folded towel on the rack (or table or shelf) and then lay a piece of saran wrap across the top of the soap and then put another folded towel on top. This helps contain the heat of the soap. OR, if you mold fits in your oven, you can turn your oven on low heat (about 175 degrees) and let it sit in there over night.
10. Now, you’ve got a sink full of dirty dishes. What I like to do it rinse the bowl with the fragrance oil and set aside. Leave the dirty pot you mixed your soap in until the next day. If you wash it right after making your soap, it will be greasy / oily feeling and won’t wash well. If you leave it until the next day, it will have hardened up, and when you wash it, you won’t have to add any soap to wash it, because it’ll be lined with soap! Add some hot water, and see how well it bubbles. Mmm.. and it smells good too. ![]()
11. It’s 24 hours later, give or take, and you’re ready to unmold your soap. Yay! Gently remove the soap from the mold.

12. Slice and allow to cure… 3 or 4 months is good, if you can wait that long. Your soap will harden up and shrink some, as the remaining liquid is evaporated from the soap. If you can’t wait long, give it a week or so before you use it. It won’t be as good as it will be in a few months, but it will work.

This soap is not suitable for your face or ‘tender parts’. It makes a wonderful wake-me-up morning soap, but do be careful where you use it. Or in a soap tray for hand washing. It’s great for after cooking and gardening.
If you are looking for a soap for your face (and all over parts), try Nana’s Lavender Goat Milk Soap Recipe, or it’s Vegan alternative Nana’s Vegan Lavender Soap recipe.


